현제의 현재이야기
[멋쟁이사자] django 로 개인 블로그 만들기 과제 리뷰 본문
미루고 미루다가 이제야 쓰는 과제 리뷰. 다음부터는 만들면서 글을 작성해야겠다.
우선 제출한 동영상
기억나는 중요 과제 조건
- CRUD를 폼으로 작성
- 사진 첨부 가능하게
- 푸터, 헤더 모든 페이지 동일하게 고정
- 댓글 기능, 비로그인자도 댓글 달 수 있게
- 로그인, 회원가입 구현과 로그인을 해야 글 작성 가능하게
- 적당히.. 꾸미기?
애먹었던 point
나머지는 스터디때 한 것이랑 거의 비슷해서 괜찮았는데 업데이트를 forms.py로 구현하는 것과 댓글 구현하는 것이 가장 어려웠다.
-update 관련-
views.py
def update(request, id):
    blog = get_object_or_404(Blog, pk = id)
    if request.method == "POST":
        form = BlogForm(request.POST, request.FILES, instance=blog)
        if form.is_valid():
            blog = form.save(commit=False)
            blog.pub_date = timezone.now()
            blog.save()
            return redirect('blog:detail', blog.id)
        else:
            return redirect('home')
    else:
        form = BlogForm(instance=blog)
        return render(request, 'update.html', {'form': form})
update 에서 오류가 계속 났던게 id를 pk로 안넣고 id를 id로 넣은 다음, instance = blog를 위에다가 안넣어서 계속 새 글이 작성되었다..
update.html
{% extends 'base.html' %}

{% block content %}

<br/><br/>
<h1>수정하기</h1>
<form method="post" enctype="multipart/form-data">
    {%csrf_token%}

    {{form.as_p}}
    <button type='submit'>작성하기</button>
</form>

<br/><br/>
{% endblock %}
여기서도 form action을 넣었어서 오류가 났었다.
<form action="{%url 'blog:update' %}" method="post" enctype="multipart/form-data">
    {%csrf_token%}

    {{form.as_p}}
    <button type='submit'>작성하기</button>
</form>
이렇게 넣었더니

보기도 싫은 노란색 화면.. 찾고보니 form action를 넣어서 이다. 즉 get을 할 때 id를 가져오는데 또 id를 찾으라니깐 못 찾는 오류
Reverse for '~~~' with arguments '('',)' not found. 1 pattern(s) tried: ['~~~/~~~/(?P<~~~.id>[0-9]+)$']
[django error] Reverse for '~~~' with arguments '('',)' not found. 1 pattern(s) tried: ['~~~/~~~/(?P<~~~.id>[0-9]+)$'] 해당 오류는 id값을 찾지 못해서이다 def update(request, post_id): p..
integer-ji.tistory.com
이 글에서 도움을 얻었다. 감사합니다
-댓글 관련-
views.py
def detail(request,id):
    blog = get_object_or_404(Blog,pk=id)
    comments = Comment.objects.filter(post = id)
    if request.method == "POST":
        comment = Comment()
        comment.post = blog
        comment.body = request.POST['body']
        comment.date = timezone.now()
        if request.user.is_authenticated:
            comment.user = request.user
        comment.save()
    return render(request,'detail.html',{'blog':blog, 'comments':comments})
구글링 열심히해서 넣어봤다. 댓글 form을 작성하는 것도 해봤는데 그것보다 디테일에 노출되게 하는 것이 더 좋아보여서 이렇게 코드를 짰다.
여기에 if request.user.is_authenticated: comment.user = request.user 을 넣어서 만약 로그인이 되었다면, request 한 user가 comment의 user라고 지정해두었다.
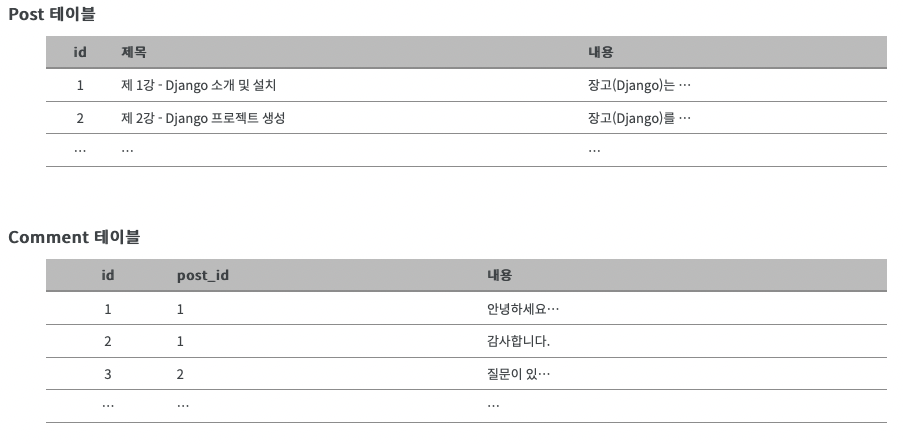
또한 Comment.objects.filter(post = id)라고 지정해서 해당 포스트의 댓글만 comments에 넣었다. post에 넣은건 아마도.. models.py의 Comment.post가 되지 않을까?
models.py
class Comment(models.Model):
    user = models.ForeignKey(CustomUser, null=True, on_delete=models.CASCADE)
    post = models.ForeignKey(Blog, on_delete=models.CASCADE, null=True)
    body = models.TextField()
    writer = models.CharField(max_length=20, null=True)
    date = models.DateTimeField(default=timezone.now)
on_delete=models.CASCADE : 계단식 동작은 일반적으로 모델 간의 관계를 설정할 때 사용됩니다. 참조 된 개체가 삭제되면 해당 참조 된 개체를 참조하는 모든 개체도 삭제됩니다.
ForeignKey를 넣은 이유... 해당 댓글은 특정한 게시글이 있어야 하기 때문이다. 즉, 부모 게시글에 자식 댓글들이 줄줄 달리는 것.
https://076923.github.io/posts/Python-Django-11/
이런식으로.. 저기에 restful api를 통한 댓글 구현도 자세히 나와있으니 참고해보야겠다.
detail.html
      <div class="container1">
        {% for comment in comments %}
        {% if comment.user.username %}
        <div class="card border-light mb-3" style="max-width: 40rem; height:5rem; margin: 0 auto;">
          <div class="card-header">{{comment.user.username}} | {{comment.date}}</div>
          <div class="card-body">
            <p class="card-text">{{comment.body}} </p>
            <br>
          </div>
        </div>
        {% else %}
        <div class="card border-light mb-3" style="max-width: 40rem; height: 5rem; text-align:center; margin: 0 auto;">
          <div class="card-header">익명 | {{comment.date}}</div>
          <div class="card-body">
            <p class="card-text">{{comment.body}} </p>
            <br>
          </div>
        </div>
      </div>
        {% endif %}
        {% endfor %}
      </div>
  </div>

        <br>
        <br><br>
      <div class="container2">
        <form method="POST">
          {% csrf_token %}
          <input name="body" type="text" style="width: 40rem; height: 8rem"value={{comment.body}}>
          <input class="btn btn-primary" type="submit" value="댓글 입력">
        </form>
      </div>
<br/><br/>로그인 해야 글 작성 되게
이 부분은 조금 고민하다가 is_authenticated를 활용해서 해결하였다.
views.py
def create(request):
    form = BlogForm(request.POST, request.FILES)
    if form.is_valid():
        new_blog = form.save(commit=False)
        new_blog.pub_date = timezone.now()
        if request.user.is_authenticated:
            new_blog.user = request.user
        else:
            return redirect('blog:mustsign')
        new_blog.save()
        return redirect('blog:detail', new_blog.id)
    return redirect('home')

def mustsign(request):
    return render(request, 'mustsign.html')
만약 로그인 되어있다면 요청한 user는 블로그의 user가 되고, 아니면 mustsign으로 간다.
mustsign.html
{% extends 'base.html' %}
{% block content %}
{% load static %}
{% load bootstrap4 %}
</br></br>
<img src = "{% static '무지1.png' %}" alt = "">
    </br>
</br></br>
    <h4>로그인을 하셔야 글을 적을 수 있습니다.</h4>
    </br></br>
    <a href="{% url 'account:signup' %}"><button>회원가입</button></a>
    <a href="{% url 'account:login' %}"><button>로그인하기</button></a>
    <a href="{% url 'home' %}"><button>돌아가기</button></a>
</br></br>
</br></br>
{% endblock %}
이곳으로 오면 이렇게 로그인하라고하고 회원가입, 로그인하기, 돌아가기가 나온다.
그외 css
사실 가장 힘들었던 부분인데 부트스트랩을 잘 이용하여 대충 꾸몄다. 특히 버튼 같은 경우에는 너무 잘 되어있어서 그냥 갔다 붙이기만 하면 된다. 이번에 하면서 알았던 부분은
          <form action="{% url 'home' %}">
            <input type="text" name="query">
            <button type="submit" class="btn btn-secondary">검색</button>
          </form>
input 상자와 button을 저렇게 <form>으로 감싸주면 버튼을 누르면 form action이 되게끔 설정이 된다.
<a href="{% url 'home' %}"><button>돌아가기</button></a>또한 버튼에 링크를 다는 것은 <a> 태그에 href 태그로 감싸주면 잘 작동이 된다.
오류 및 후기
장고 배우고 거의 처음 실습하는 거라 시간도 좀 오래 걸리고 오류도 많았다. 사실 장고로 만드는 것 보다 css로 꾸미는 것이 나한테 제일 어려웠다.
몇가지 오류가 존재하는데 우선 댓글을 달고 페이지 새로고침을 하면 똑같은 내용의 댓글이 달리는 점. 그리고 글을 수정하면 수정한 글이 가장 최근 글로 나오는 오류가 있는데 이는
def home(request):
    blogs = Blog.objects.order_by('-pub_date')
views.py에 이것 때문인 것 같다. 해결 가능할 듯?
--해결완료
def update(request, id):
    blog = get_object_or_404(Blog, pk = id)
    if request.method == "POST":
        form = BlogForm(request.POST, request.FILES, instance=blog)
        if form.is_valid():
            blog = form.save(commit=False)
            blog.save()
            return redirect('blog:detail', blog.id)
        else:
            return redirect('home')
blog.pub_date = timezone.now()를 삭제하니깐 수정을 해도 예전 pub_date가 그대로 유지되었다. 굿!
홈페이지가 대충 굴러가는 원리를 알았고 이를 활용해서 내가 만들고 싶었던 것을 만들 수 있을 것 같다.
'Django' 카테고리의 다른 글
| 새로운 프로젝트 구상 (0) | 2022.11.16 |
|---|---|
| [DRF/RESTful API] Read (0) | 2022.07.25 |
| what is api?? (0) | 2022.07.22 |
| 장고 복습 7/9 (0) | 2022.07.09 |
| 장고 복습 7/8 (2) | 2022.07.08 |
